What to Do if You Have a Bulging Disk
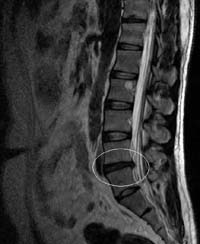
MRI Scan of Lumbar Disc Herniation

Image via Wikipedia

Lower back pain presents in a range of severity depending on the structures generating the pain.

A simple sprain/strain can still cause extreme pain, swelling, and immobilization for a couple of days but should completely resolve after a few weeks with proper care and rest.  Lumbar sprain/strains are associated with lifting something heavy, or even simply bending or twisting at the waist; weight lifting, sports injuries and trauma like a car accident.  By definition, they are limited to injury to the muscles, fascia, tendons and ligaments.  The pain is limited to the area of injury.

annotated diagram of preconditions for Anterio...

Image via Wikipedia

A lumbar disc bulge occurs when a disc “bulges” outwards due to weakness or injury.  A disc is a tough, fibrous ligament that holds the lumbar vertebrae together at the vertebral body.    The disc’s outer periphery, called the annulus, resembles a slice of an onion, with multiple rings of fibrous tissue encasing a jelly-like material called the nucleus pulposus.  While tough and strong, it allows movement of the individual vertebrae.

By definition, a disc bulge is still intact and has not ruptured (as opposed to a disc herniation or rupture).  The bulge represents a weakened area in the annulus that allows the nucleus to gravitate towards a section of the periphery, usually the posterior (rear-facing) edge, facing the spinal canal (where nerve tissue is present).  It can be a broad-based bulge, or a more focal bulge.  If it is greater than 5mm (measured from the edge of the vertebral body to the tip of the bulge) it is clinically significant.  Many people have disc bulges and have no back pain at all; in fact, it is normal for the discs to bulge slightly in the weight bearing position (standing).

The problem occurs when the bulge contacts nerve structures.  If large enough, they can contact the thecal sac (contains the spinal cord and cauda equina) by bulging backwards into the canal, and they can press on spinal nerve roots by bulging to the sides.  The spinal nerve roots branch out in pairs from either side and exit holes formed between adjacent vertebrae called vertebral foramen, or lateral canals.  A disc bulging to the posterior and side can narrow this opening and pinch the nerve root causing pain to travel down the buttock or leg, depending on which nerve root.

TREATMENT:

If your lower back pain is felt deep, and you can make it hurt more by bending your lower back backwards and to the side, you may have a disc bulge.  You may or may not have pain and/or numbness going down the buttock and leg (same side of the pain).  If it happened while lifting something heavy, the diagnosis is more likely.  If you have extreme, unchanging pain with more constant leg pain or paresthesias (numbness, tingling) that does not get better with ice and rest, you may have a disc rupture (also called prolapse) where the inner nucleus had broken through the annulus and is in the spinal canal or lateral canal.  If you have changes in your gait (walk) such as foot drop, weakness in your legs, difficulty walking upstairs, then the diagnosis of disc prolapse  is more probable.

Disc bulges can be managed with conservative treatment like home care, chiropractic, and physical therapy.  Disc prolapses should be evaluated by an orthopedic surgeon or neurosurgeon.  An MRI should be ordered to evaluate the extent of the injury.

If you suspect you have a disc bulge, take care not to aggravate it.  No heavy lifting, no jumping activities (basketball, badminton– anything where your feet leave the floor and land hard).

Discs usually bulge backwards (posterior), so do movements that encourage the bulge to move back to center.   Lie on your back and bring both knees to your chest (ok to use your arms to grab your knees while they are bent, and pull and hold to your chest).  This will put your lumbar spine in flexion, or a nice convex curl.  Your back contour should be like that of an egg, and you should be able to rock back and forth.  Maintain the pull, stretching your lower back into this curve.   Hold for 30 seconds, then slowly extend your legs on the floor and rest for 15 seconds (optional:  put a frozen ice gel pack covered with a kitchen towlette under your lower back during this exercise).  Repeat six times.  This will have the effect of creating separation between the posterior ends of the lumbar vertebrae, helping to reduce the bulge.

Next, stand and place your hands on your hips, and slowly arch your back backwards, putting your lumbar spine into extension— the opposite curvature as the previous exercise.  Bend back until you can’t anymore, but don’t over do it.  Hold this position for six seconds, then return to neutral.  Repeat eight times.  This will have the effect of bringing the posterior ends of the lumbar vertebrae closer together and pushing the nucleus back towards the center.

Do the above series of exercises three-four times a day for a week until the discomfort is gone.  At this point, you should focus on doing things to strengthen the disc.  Eating a wholesome, healthy diet with enough protein, fat and plant material will help; avoiding destructive activities like smoking, alcohol, and staying up late will enable optimum conditions for tissue healing.  Gradually start doing exercises that improve lower back muscle conditioning and coordination.

Getting a series of 6-8 chiropractic adjustments to the lumbar spine may also  be helpful in reducing your bulging disc.

Carpal Tunnel Syndrome

A rigid splint can keep the wrist straight.

Image via Wikipedia

Carpal tunnel syndrome is a condition where one of the major nerves of the arm gets compressed in the wrist.  It can lead to pain, numbness, and tingling in the hands.  Advanced symptoms are muscle weakness in the hands, muscle atrophy (shrinking), especially of the thumb pad;  and loss of motor coordination in fine dexterity skills, like buttoning a blouse.

The three main nerves that are responsible for controlling the arm are the ulnar, median, and radial nerves.  The median nerve, like its name implies, travels down the middle of the arm.  It passes through the carpal tunnel  which is just above the crease in the wrist before splitting into branches that go to the thumb, index, middle, and inner half of the ring finger.

The carpal tunnel is a small diameter hole formed by the wrist bones and the transverse carpal ligament.  It contains the tendons that flex the fingers (flexor tendons), and the median nerve.  Pressure as light as a penny can adversely affect nerve tissue, so any pressure increase in the carpal tunnel will over time injure the median nerve.

The most common cause of increased pressure in the carpal tunnel is thickening of the flexor tendons due to long term repetitive use of the fingers such as in typing.  Over time the tendons press the median nerve against the rigid transverse carpal ligament.  The nerve loses oxygen and it starts to malfunction.  Left alone, the damage will be permanent as nerves have a limited ability to regenerate.

Other possible causes are prior injury to the wrist that narrows the carpal tunnel and arthritic or other pathological changes in the wrist bones that cause them to occlude the tunnel.

Pregnancy and thyroid conditions may mimic symptoms of carpal tunnel syndrome.

TREATMENT:

Scars from carpal tunnel release surgery. Two ...

Image via Wikipedia

If the symptoms are advanced (pain, numbness, tingling especially at NIGHT and loss of hand coordination and muscle atrophy) see your doctor.  The doctor should refer you to a hand specialist who may order a nerve conduction test to diagnose carpal tunnel syndrome.  If your test is positive, you may be referred for physical therapy, which will involve mostly stretching and hand exercises.  If that doesn’t work, you may be offered a cortisone injection and exercise prescription, a wrist brace and orders to avoid prolonged hand usage.  The last option is carpal tunnel release surgery, where the transverse carpal ligament is surgically cut to relieve pressure in the tunnel.

If your condition is not advanced, do the following:

If your job or hobby requires lots of finger and hand activity, there is a good chance that this is the cause of your symptoms.  Check your work station set up and ensure the following:

a.  Keyboard should be low enough so that your fingers are at the level of the keyboard when:

  • your upper arms and shoulders are relaxed; your upper arms (above the elbow) are to the side of your body almost touching;
  • your elbows are bent 90-100 degrees
  • your wrists are straight or even bent slightly downward

The most important part is having your shoulders relaxed.  To see if you are doing it right, using your right hand press the top of your left upper shoulder, from the neck down to the shoulder joint.  It should be relatively soft.  If it is not, you are unconsciously contracting the neck and upper trapezius muscles and lifting the arm.

If you find you can’t accomplish the above, due to your desk being too high, you need to get an adjustable keyboard tray and install it under your desk.  Place the keyboard on this tray and lower and angle the tray so that you can meet these requirements (see video below on how to do this).

b.  The top 1/3 of your monitor screen should be at eye level.  Use phone books or a monitor lift to get it to this position.   Place the monitor close enough that you don’t  have to bend your neck forward to see text on your screen, or adjust your screen settings to magnify the text.

c. The mouse and frequently used equipment should be close so that you don’t have to reach forward for them.  Your keyboard tray should have an attached mouse pad; use it.

d. Remember to keep your head in a position where your ears are directly over your shoulders.

e. Every few minutes, relax your hands and wrists for 20-30 seconds.

f. Every hour do the wrist, neck and shoulder exercises in the video.

g. When symptoms are gone, you can do wrist strengthening exercises.

Exercise for Thoracic Outlet Syndrome

The thoracic outlet is an “opening” at the base of the neck, on both sides, where the nerves and artery that service the arm on that side exit through as they descend into the arm.  It is formed by the anterior and medial scalene muscles, the first rib, and the clavicle (collar bone).

If the thoracic outlet narrows in any way, due to one or more of these structures, neurovascular compression is possible (compression of the nerves and artery).  This can result in shoulder pain, neck pain, weakness in the affected arm and hand, numbness and tingling in the arm down to the hands, especially the last three fingers; and in some cases swelling of the arm.  Carrying something like a heavy bag on the affected shoulder makes the symptoms worse.

In thoracic outlet syndrome there is usually a history of prior injury/trauma to the shoulder girdle, such as a car accident or sports injury.  People with long necks and long arms are said to be more predisposed to this condition as the weight of the arm and length of the neck tend to put more stress in the thoracic outlet area.

Left alone without resolution, it is possible to develop permanent nerve damage resulting in chronic pain, weakness in the arm and hand, and reduced sensation in the inner arm area.

What to Do if You Suspect You Have Thoracic Outlet Syndrome

If you suspect you have thoracic outlet syndrome, see your doctor or an experienced chiropractor.  There are some simple orthopedic tests that can be done to see if you likely have TOS.  An MRI study can help visualize the thoracic outlet and identify if there is swelling; and needle electromyograph (EMG) can determine if the arm muscles are getting the proper amount of nerve flow.

If the diagnosis is confirmed, physical therapy exercises are usually prescribed to help open the thoracic outlet space.   In some cases, imaging studies show a fibrous band  responsible for compressing the neurovascular structure; in these cases surgery may be an option.  This involves the scalene muscles — three, short muscles that connect the lower neck vertebrae to the ribcage.

In the meantime, try doing this exercise.  It is designed to create more space between the collar bone and the ribcage.  If this is where your compression is occurring, it may help.


Want to Feel 10-20 Years Younger?

Want to Feel 10-20 Years Younger?

Enter your email for a Free 30-day plan to eliminate aches & pain, improve mobility and BOOST your energy!

As a Subscriber, you will also learn innovative self-rehab methods used by experts in human biomechanics to help you reach your health & fitness goals.

You will also instantly receive this FREE ebook, Concepts of Self Healing - actionable steps you can take today, to get you back on the road to optimal health.

Please check your email in 5 minutes to access your Special Report. Make sure to whitelist "newsletter@painandinjurydoctor.com" in your email client (Gmail, Yahoo, Outlook, etc.) so that you don't miss this valuable information. One way is to add this email to your email Contacts.